How To Set Up PayPal Integration With PHP & MYSQL
This post was last updated on Thursday 26th July 2018.
PayPal is the most popular payment service on the web so being able to integrate your website with PayPal’s Instant Payment Notification Service (IPN) is essential if you need to process payments through your website.
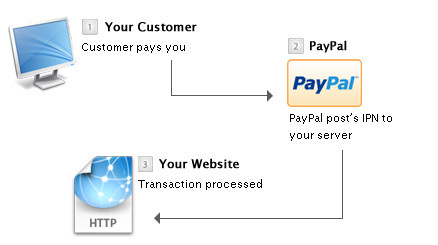
There are 3 main parts to the PayPal IPN system:
A webpage that initiates a request to PayPal to make a payment.
A PHP page on your webserver that PayPal calls to notify you that payment has been made.
A webpage that confirms the above payment and continues on to the next phase of your web application, such as a 'Thank You' page.
Parts 1 and 3 are accessible by customers on your website. Part 2 is only visible to PayPal. The diagram below illustrates the interaction between your customer, PayPal and your website.
The following steps break down each part of the process into easy to follow chunks, it is assumed that you have knowledge of PHP and MySQL.
NOTE
If you are not receiving the correct response from Paypal ensure that you are using the main test account (Verified Business Account) from your Paypal Sandbox account.
Also ensure that you are testing the Paypal IPN Script on an online webserver (Not MAMP, Xampp etc..) as Paypal requires a reachable 'return url', 'cancel url' and 'notify url'.
STEP 1 – SETUP PAYPAL ACCOUNT
Sign up for a PayPal account if you don’t already have one. In order to use IPN, the Paypal account you are selling from must be a Business Account.
Once you have a registered PayPal account your account must be setup correctly to use IPN. Select 'edit profile' from your PayPal account and check the following settings.
Under 'My Selling Preferences' >> 'Getting paid and managing risk' >> 'Instant Payment Notification Preferences'
Set the IPN value to 'On'
Set the IPN URL to the PHP page containing the IPN code shown in steps 3 & 4 of this tutorial. (http://www.example.com/payment.php)
Under 'My Selling Preferences' >> 'Getting paid and managing risk' >> 'Block payments'
Block payments from users who pay with eCheque. (This is because these will not be instant payments)
Under 'account information' >> 'email'
Note down your primary email address. This email will be visible to users so make it a professional one. User's may feel apprehensive about sending money to an e-mail address with the domain 'hotmail.com' or 'Yahoo.com' etc...
STEP 2 – SIMPLE HTML FORM
Your website must now send all the required values to PayPal so that the payment can be processed.
The following code example demonstrates a basic form that we will use to send the values:
<!DOCTYPE html> <html> <head> <meta charset="utf-8"> <meta http-equiv="X-UA-Compatible" content="IE=edge"> <meta name="viewport" content="width=device-width, initial-scale=1"> <title>Paypal Integration Test</title> </head> <body> <form class="paypal" action="payments.php" method="post" id="paypalform"> <input type="hidden" name="cmd" value="xclick" /> <input type="hidden" name="nonote" value="1" /> <input type="hidden" name="lc" value="UK" /> <input type="hidden" name="bn" value="PP-BuyNowBF:btnbuynowLG.gif:NonHostedGuest" /> <input type="hidden" name="firstname" value="Customer's First Name" /> <input type="hidden" name="lastname" value="Customer's Last Name" /> <input type="hidden" name="payeremail" value="customer@example.com" /> <input type="hidden" name="item_number" value="123456" / > <input type="submit" name="submit" value="Submit Payment"/> </form> </body> </html>
The business name, price, submit type, notify URL and other sensitive values will be sent during the next step.
A full list of the values to send can be found at the PayPal website under the title "A Sample IPN Message and Response".
STEP 3 – THE REQUEST
The payment.php page will be used to handle the outgoing request to PayPal and also to handle the incoming response after the payment has been processed.
To make a request for payment we need to first build up the parameters and pass these to PayPal via the query string.
We need to pass the following values:
business - the email address of your PayPal account
item_name - the name of the item being purchased
amount - the price of the item
return - the address to return to after a successful payment
cancel_return - the address to return to after a cancelled payment
notify_url - the address of the payments.php page on your website
custom - any other data to be sent and returned with the PayPal request
// For test payments we want to enable the sandbox mode. If you want to put live // payments through then this setting needs changing to `false`. $enableSandbox = true; // Database settings. Change these for your database configuration. $dbConfig = [ 'host' => 'localhost', 'username' => 'user', 'password' => 'secret', 'name' => 'exampledatabase' ]; // PayPal settings. Change these to your account details and the relevant URLs // for your site. $paypalConfig = [ 'email' => 'user@example.com', 'returnurl' => 'http://example.com/payment-successful.html', 'cancel_url' => 'http://example.com/payment-cancelled.html', 'notify_url' => 'http://example.com/payments.php' ]; $paypalUrl = $enableSandbox ? 'https://www.sandbox.paypal.com/cgi-bin/webscr' : 'https://www.paypal.com/cgi-bin/webscr'; // Product being purchased. $itemName = 'Test Item'; $itemAmount = 5.00; // Include Functions require 'functions.php'; // Check if paypal request or response if (!isset($POST["txnid"]) && !isset($POST["txntype"])) { // Grab the post data so that we can set up the query string for PayPal. // Ideally we'd use a whitelist here to check nothing is being injected into // our post data. $data = []; foreach ($POST as $key => $value) { $data[$key] = stripslashes($value); } // Set the PayPal account. $data['business'] = $paypalConfig['email']; // Set the PayPal return addresses. $data['return'] = stripslashes($paypalConfig['returnurl']); $data['cancelreturn'] = stripslashes($paypalConfig['cancelurl']); $data['notifyurl'] = stripslashes($paypalConfig['notifyurl']); // Set the details about the product being purchased, including the amount // and currency so that these aren't overridden by the form data. $data['itemname'] = $itemName; $data['amount'] = $itemAmount; $data['currencycode'] = 'GBP'; // Add any custom fields for the query string. //$data['custom'] = USERID; // Build the query string from the data. $queryString = httpbuildquery($data); // Redirect to paypal IPN header('location:' . $paypalUrl . '?' . $queryString); exit(); } else { // Handle the PayPal response. }
To construct the query string we assign the post data to an array that we then push some additional values to that we don't want to be altered by the post data. This way we can ensure that a user cannot manipulate the amount being paid or any other details that may be vulnerable. We then use httpbuildquery to convert the array to a query string and pass this to PayPal via the header.
STEP 4 - THE RESPONSE
We now want to handle the response from PayPal, this is the callback PayPal makes to our notify URL we configured earlier. We reassign the post response to a local variable and then verify the transaction is authentic and check we've not already processed this transaction before adding the payment to our database.
To do all this we want to add the following code to the else statement of our payments.php script.
// Handle the PayPal response. // Create a connection to the database. $db = new mysqli($dbConfig['host'], $dbConfig['username'], $dbConfig['password'], $dbConfig['name']); // Assign posted variables to local data array. $data = [ 'itemname' => $POST['itemname'], 'itemnumber' => $POST['itemnumber'], 'paymentstatus' => $POST['paymentstatus'], 'paymentamount' => $POST['mcgross'], 'paymentcurrency' => $POST['mccurrency'], 'txnid' => $POST['txnid'], 'receiveremail' => $POST['receiveremail'], 'payeremail' => $POST['payeremail'], 'custom' => $POST['custom'], ]; // We need to verify the transaction comes from PayPal and check we've not // already processed the transaction before adding the payment to our // database. if (verifyTransaction($POST) && checkTxnid($data['txn_id'])) { if (addPayment($data) !== false) { // Payment successfully added. } }
To verify the authenticity of the response we call the function verifyTransaction. This will take the post data received from PayPal and validate this by making a curl request to PayPal with the transaction data received. If we get back the response VERIFIED then we know that everything is OK and can proceed to add the payment to our database.
The verifyTransaction function looks like this (it can be found in our functions.php file).
function verifyTransaction($data) { global $paypalUrl; $req = 'cmd=notify-validate'; foreach ($data as $key => $value) { $value = urlencode(stripslashes($value)); $value = pregreplace('/(.[^%^0^D])(%0A)(.)/i', '${1}%0D%0A${3}', $value); // IPN fix $req .= "&$key=$value"; } $ch = curlinit($paypalUrl); curlsetopt($ch, CURLOPTHTTPVERSION, CURLHTTPVERSION11); curlsetopt($ch, CURLOPTPOST, 1); curlsetopt($ch, CURLOPTRETURNTRANSFER, 1); curlsetopt($ch, CURLOPTPOSTFIELDS, $req); curlsetopt($ch, CURLOPTSSLVERSION, 6); curlsetopt($ch, CURLOPTSSLVERIFYPEER, 1); curlsetopt($ch, CURLOPTSSLVERIFYHOST, 2); curlsetopt($ch, CURLOPTFORBIDREUSE, 1); curlsetopt($ch, CURLOPTCONNECTTIMEOUT, 30); curlsetopt($ch, CURLOPTHTTPHEADER, array('Connection: Close')); $res = curlexec($ch); if (!$res) { $errno = curlerrno($ch); $errstr = curlerror($ch); curlclose($ch); throw new Exception("cURL error: [$errno] $errstr"); } $info = curlgetinfo($ch); // Check the http response $httpCode = $info['httpcode']; if ($httpCode != 200) { throw new Exception("PayPal responded with http code $httpCode"); } curlclose($ch); return $res === 'VERIFIED'; }
Once the transaction has been verified and before we add it to our database it is a good idea to check that we've not already processed it. That's what our call to checkTxnid is going to do. This simply checks that the txn_id value from PayPal does not already exist in our database.
function checkTxnid($txnid) { global $db; $txnid = $db->realescapestring($txnid); $results = $db->query('SELECT * FROM `payments` WHERE txnid = \'' . $txnid . '\''); return ! $results->num_rows; }
This is also a good opportunity for you to add any additional checks you might want to put in place before accepting the payment on your site. For example, you might want to check the amount paid tallies with the amount you were charging.
STEP 5 - ADD THE PAYMENT
With the response from PayPal verified and any additional checks we want to make at our end complete it's time to add the payment to our database.
To store payment details in our database a payments table must be created. The following MySQL will create the payments table used in this example code.
CREATE TABLE IF NOT EXISTS `payments` ( `id` int(6) NOT NULL AUTOINCREMENT, `txnid` varchar(20) NOT NULL, `paymentamount` decimal(7,2) NOT NULL, `paymentstatus` varchar(25) NOT NULL, `itemid` varchar(25) NOT NULL, `createdtime` datetime NOT NULL, PRIMARY KEY (`id`) ) ENGINE=MyISAM DEFAULT CHARSET=utf8 AUTOINCREMENT=1 ;
Then in our code we're calling addPayment to insert a payment into the database. This function looks like this:-
function addPayment($data) { global $db; if (isarray($data)) { $stmt = $db->prepare('INSERT INTO `payments` (txnid, paymentamount, paymentstatus, itemid, createdtime) VALUES(?, ?, ?, ?, ?)'); $stmt->bindparam( 'sdsss', $data['txnid'], $data['paymentamount'], $data['paymentstatus'], $data['itemnumber'], date('Y-m-d H:i:s') ); $stmt->execute(); $stmt->close(); return $db->insert_id; } return false; }
SANDBOX TESTING / GOING LIVE
PayPal Sandbox offers all of the functionality of PayPal, but uses "Fake accounts" created by the developer within the sandbox. You can create fake buyer and fake seller profiles, then test your PayPal integration through your development website. Sandbox accounts can be created on the PayPal Developer website for free.
When testing with the sandbox we use the www.sandbox.paypal.com URL. For live payments we need to use www.paypal.com. Our example code is configured to use the sandbox, but you can switch it to live payments by changing $enableSandbox to false, this will update the URLs used to communicate with PayPal.
Once the payment process is ready to be used by real customers you will need to disable the sandbox mode in the code.
That’s it; you’re ready to start taking payments online through your website.
PAYPAL INTEGRATION - SOURCE FILES
You can find the complete code for this integration on GitHub.
If you require expert support with your next web development project, check out our development services today.