Video processing with Amazon’s AWS transcoder

Amazon’s AWS service provides a useful means of transcoding a video from one format to another and generating thumbnails in the process.
In order to transcode a video, we will need to use AWS’s buckets, pipelines, jobs and presets.
We will use the buckets to upload the original videos and output the transcoded files to. So, we will use two buckets, one for the source and one for the destination.
Pipelines are what we use to link the source and destination buckets. These are queues that will manage the transcoding process
Jobs will do the actual transcoding work.
Finally, our presets are what define the parameters for our video and audio of the output files. AWS comes with some standard system presets for common outputs but it is possible to create custom ones too.
In this post we will look at setting up the complete transcoding process in AWS. From setting up the buckets right through to creating the transcoding job; and finally take a look at how we can receive notification of the process being completed.
Setting up the S3 buckets
Let’s start by setting up two buckets. We do this from the Amazon S3 section. Give each bucket a name and choose the region you want for the bucket. As an example, I've set up the following two buckets:-
transcoder-source
transcoder-dest
We will use transcoder-source to upload new videos to and transcoder-dest will be used to write the newly transcoded files. Name these buckets whatever you want so that they make sense to you. Remember that the bucket names need to be unique and DNS-compliant; if someone out there is already using a specific bucket name you won’t be able to use that. Also remember that you cannot change the bucket name later on and that the destination bucket name will be visible in the URL of output videos.
Elastic transcoder pipeline
Now that we’ve sorted out our buckets we will want to set up a new Transcoding Pipeline. We’re going to use the Elastic Transcoder for this so head over to that section in AWS.
Let’s create our new pipeline by clicking on the ‘Create New Pipeline’ button (it should be towards the top of the page in the Elastic Transcoder section).
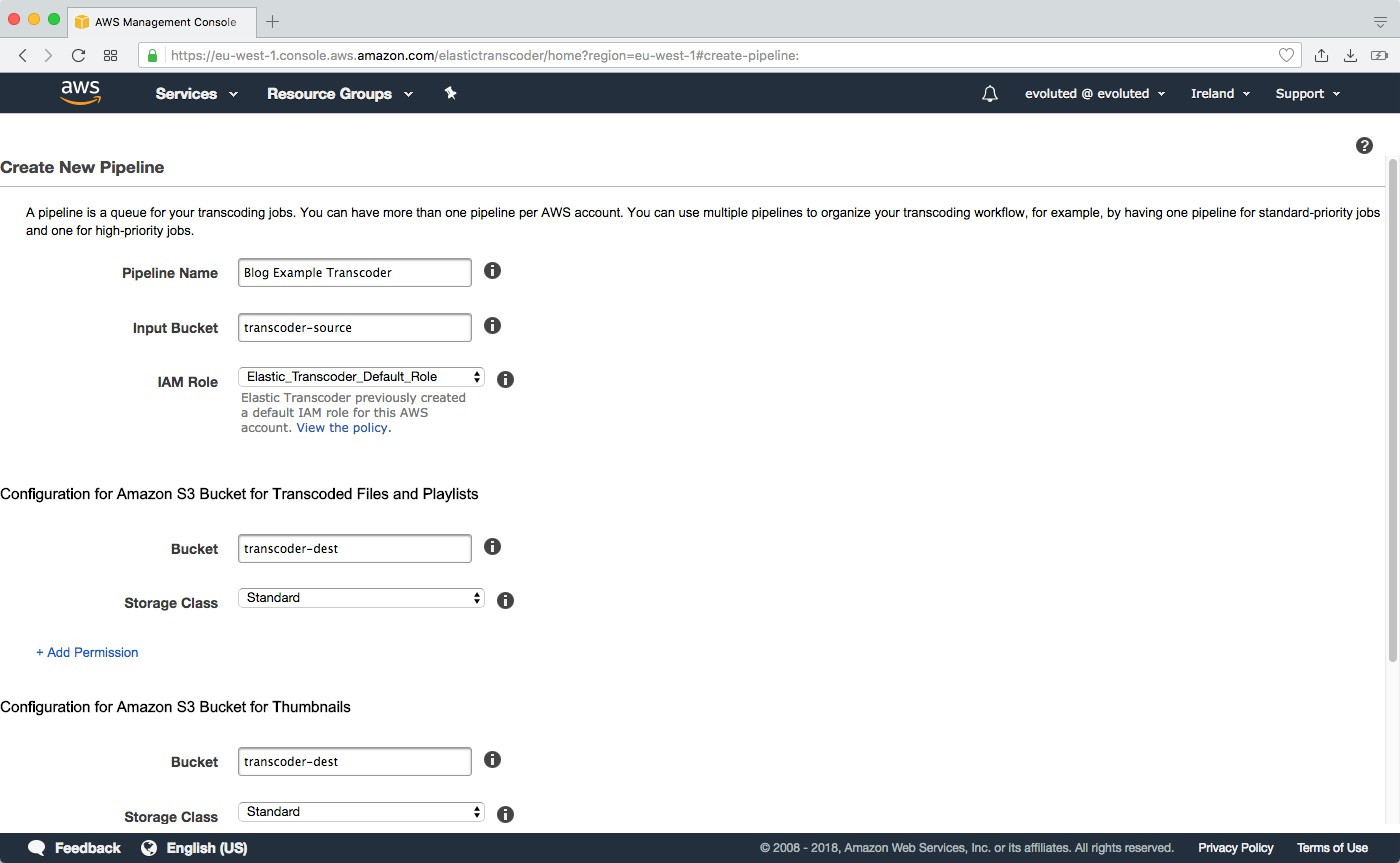
We need to give our pipeline a name and define our input bucket, that’s our source bucket so in my example that would be ‘transcoder-source’. We also want to set the IAM Role to be ‘ElasticTranscoderDefault_Role’.
Next, we need to tell the pipeline where to write the transcoded files. You should see a couple of sections on the Create New Pipeline page for configuring the S3 buckets one for ‘Transcoded Files and Playlists’ and another for ‘Thumbnails’. We’re going to set both of these to use our destination bucket, e.g. ‘transcoder-dest’, and set the storage class to ‘Standard’.
We can now just click on the ‘Create Pipeline’ button at the end of the form to save our pipeline.
Setting up a role
Roles in AWS can be a bit of a minefield, but we're going to need to set one up so that we can assign permissions for the next part of the process. So let's go to the IAM section for roles.
Click on the 'Create role' button and choose the 'Lambda' service for the role. Then click 'Next: Permissions' to proceed.
We now want to attach the required permission policies to our new role. Search for each of the following policies and add them by checking the checkbox next to the name:-
AmazonS3FullAccess
AmazonElasticTranscoderRole
AmazonElasticTranscoderJobsSubmitter
CloudWatchLogsFullAccess
Click 'Next: Review' to confirm these for the role. Then add a name and complete the set up by clicking 'Create role' at the bottom of the page. Remember what you've just called this role as we will shortly be using it.
Creating transcoder jobs with AWS Lambda
So far, we’ve defined a couple of buckets, one that we will upload video files to and another for writing out our transcoded files; and we’ve set up a pipeline that will link these two buckets. We now need to tie this all together and create transcoder jobs using the pipeline we have just created whenever a video is uploaded to the source bucket. We’re going to use an AWS Lambda function to do this.
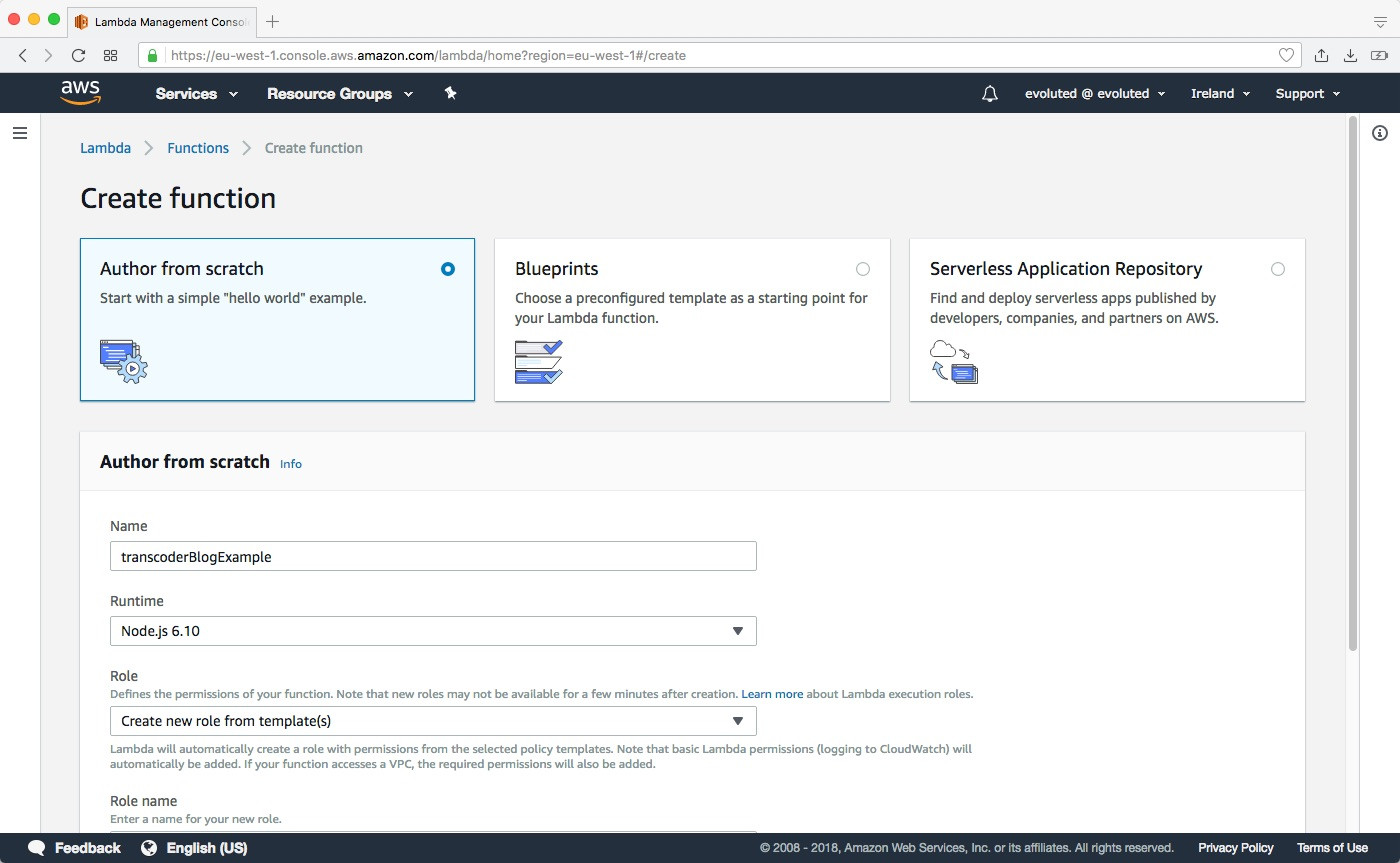
We need to go to the AWS Lambda section and click on the ‘Create Function’ button. We’re going to use the ‘Author from scratch’ option. Give the function a name, e.g. ‘transcoder’ and make sure the ‘Runtime’ option is set to use Node.js (I’m using Node.js 6.10).
We also need to give our function some permissions so we need to assign the role we created a moment ago in IAM. Make sure the role option in set to 'Choose an existing role' and enter the name of the role in the 'Existing role' input field.
Now click ‘Create Function’ to proceed.
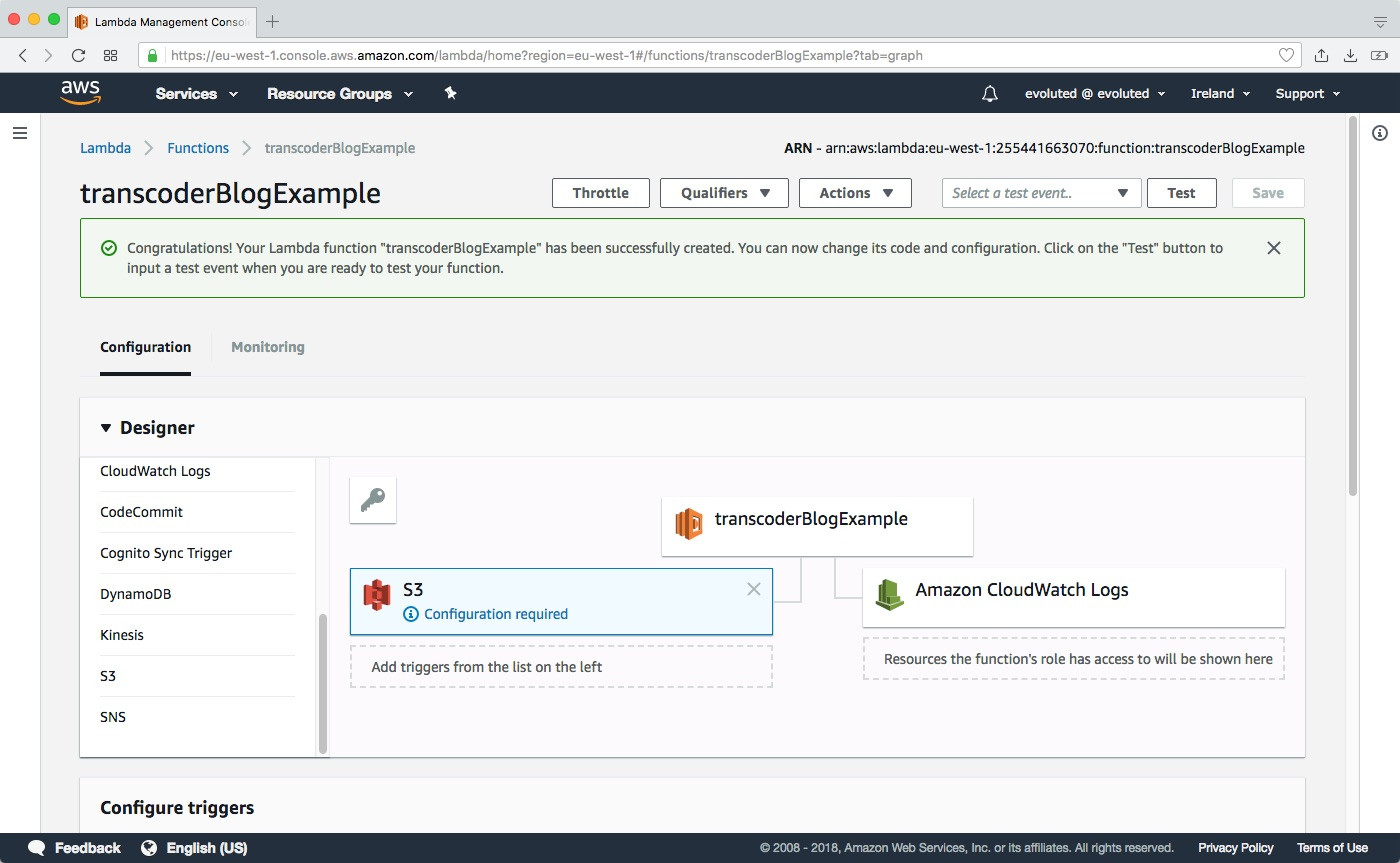
The next step is to configure our new function. Using the ‘Designer’ find ‘S3’ and add that as a trigger by selecting it. An S3 block should appear in the triggers with the warning that it needs configuring. A ‘Configure triggers’ panel should have appeared below, but if not just select the trigger to make it appear. Set the bucket to be our source bucket, again in my example this would be ‘transcoder-source’. The ‘Event type’ will define what event will trigger the Lambda function, for now leave this as ‘Object Created (All)’. Make sure that the ‘Enable Trigger’ checkbox is checked then click ‘Add’.
The Lambda function
Now it’s time to add some code to our function. I’ll start by showing you the entire Lambda script we’re going to use and then we’ll look at what’s going on in it.
To view the function's code editor you need to click on the name of the Lambda function in the 'Designer' panel. The following will want adding to the editor in the ‘Function code’ panel that appears (replacing the example code):
'use strict'; var AWS = require('aws-sdk'); var ElasticTranscoder = new AWS.ElasticTranscoder({ apiVersion: '2012–09–25', region: 'eu-west-1' }); exports.handler = function(event, context) { var sourceBucket = event.Records[0].s3.bucket.name; var sourceFilename = event.Records[0].s3.object.key; if (sourceBucket !== 'transcoder-source') { // CHANGE ME context.fail('Wrong video source bucket'); return; } // Define the Elastic Transcoder pipeline. var pipelineId = '1506508707963-rkqzsd'; // CHANGE ME // Define the preset we want to use. var presetId = '1351620000001-000010'; // Strip any spaces from the source filename. var srcKey = decodeURIComponent(sourceFilename.replace(/\+/g, " ")); // Strip out any dots from the filename and replace with dashes, this will become our 'folder' // name in the destination bucket. var destinationFolder = sourceFilename.replace(/\./, '-'); var params = { PipelineId: pipelineId, Input: { Key: srcKey, FrameRate: 'auto', Resolution: 'auto', AspectRatio: 'auto', Interlaced: 'auto', Container: 'auto' }, Outputs: [ { // Full length video and thumbnails. Key: destinationFolder + '/web.mp4', ThumbnailPattern: destinationFolder + '/thumbs-{count}', // Must include {count} PresetId: presetId }, { // 30 second preview clip. Key: destinationFolder + '/preview.mp4', PresetId: presetId, Composition: [{ TimeSpan: { StartTime: '0', Duration: '30' } }] } ] }; ElasticTranscoder.createJob(params, function(err, data){ if (err) { console.log(err); context.fail(); return; } }); };
So what’s going on here? Well we start by adding the AWS SDK using require('aws-sdk') and then create a new instance of the ElasticTranscoder (you’ll want to make sure you’re using the correct ‘region’ for your needs here).
var AWS = require('aws-sdk'); var ElasticTranscoder = new AWS.ElasticTranscoder({ apiVersion: '2012–09–25', region: 'eu-west-1' });
We then determine the source bucket and uploaded filename from the event object that’s passed to the handler function. If it’s not the correct bucket name then we throw an error and exit the function.
var sourceBucket = event.Records[0].s3.bucket.name; var sourceFilename = event.Records[0].s3.object.key; if (sourceBucket !== 'transcoder-source') { // CHANGE ME context.fail('Wrong video source bucket'); return; }
We then create a 'folder' for where we are going to write our transcoded files to in the destination bucket. This will help keep our output files organised so we can place all our related videos and thumbnails together.
var destinationFolder = sourceFilename.replace(/\./, '-');
The next part is all about configuring our job. There are several important things to note here. We need to make sure the pipelineId is set to the pipeline we created in the Elastic Transcoder. We then have our Input details which tells the job which file we’re using in our pipeline; and finally the Ouput details which is an array telling the transcoder what presets to use for the transcoded video files and the new filename.
var params = { PipelineId: pipelineId, Input: { Key: srcKey, FrameRate: 'auto', Resolution: 'auto', AspectRatio: 'auto', Interlaced: 'auto', Container: 'auto' }, Outputs: [ { // Full length video and thumbnails. Key: destinationFolder + '/web.mp4', ThumbnailPattern: destinationFolder + '/thumbs-{count}', // Must include {count} PresetId: presetId }, { // 30 second preview clip. Key: destinationFolder + '/preview.mp4', PresetId: presetId, Composition: [{ TimeSpan: { StartTime: '0', Duration: '30' } }] } ] };
In this example we're going to be creating two videos and a set of thumbnails. The web.mp4 video will be a full length version, preview.mp4 will be a 30 second preview clip, and we will have a series of thumbnails where {count} will be replaced by an integers by AWS. We're also using the generic 720p preset for the videos.
You’ll find the IDs for the presets in the Elastic Transcoder section, there’s a subpage for all the existing Presets and you can create new ones from here too. You can find a list of the default system presets in the AWS documentation.
Finally, we create the job.
ElasticTranscoder.createJob(params, function(err, data){ if (err) { console.log(err); context.fail(); return; } });
If something goes wrong with the job we're writing the error 'err' to the log which can be found in CloudWatch. You can use console.log anywhere in the function to write to the log files if you need to debug things.
Remember to save your changes to the Lambda function when you are done.
You can test the function by using the 'Test' button at the top. If you've not set up a test yet it will ask you to configure one. Search for the 'S3 Put' event template and then edit the JSON to represent an example upload. You'll want to set the bucket to match your source bucket; and set up an S3 object representing an existing video file in that bucket, the 'key' is the filename. Add a name for your event and then save it. You can then select the test from the dropdown next to the 'Test' button and then hit the button to run it. You should get a load of output at the top of the page indicating either that it worked, or what went wrong.
Notifications of completed jobs
We should now be at a point where we can upload a video to our source bucket and it will automatically transcode to the destination folder. Adding a file to the source bucket will trigger the ‘Object Created’ event that will run our Lambda function which creates the transcoding job. However, depending on the size of your video it may take a while for the process to complete. It would be useful to get notified when the final files are ready. We can use AWS’s SNS service for this.
If you’re wanting to get notified that the transcoder is complete you will need to set up a new SNS topic and subscribe to it. From the SNS dashboard we want to click ‘Create topic’ and then give it a name; depending on how you plan on using it you may also want to give it a display name.
Once we’ve created a topic we need to add a subscription to it. From the topic details page we were redirected to we can create new subscriptions to it. If you ever need to come back to this page just click on the topic’s ARN from the topics list in the SNS section. There are several options for subscriptions: we can receive an email, SMS text message or call a callback on a website among other things. Just select the protocol you want to use and enter the address or phone number you want the notification sending to as the ‘Endpoint’.
Finally, we need to make sure that our topic is being used by our pipeline. Head back to the Elastic Transcoder section and edit the pipeline we created earlier. Towards the end of the page you’ll find a ‘Notifications’ section. There are several different events we can set up notifications for. To get notified that the pipeline is complete select ‘Use an existing SNS topic’ for the ‘On Completion’ event and select the topic we created. Then remember to save the changes to the pipeline.
Now every time a video is successfully transcoded we should receive a notification to the endpoint we defined for our subscription to the relevant topic. It’s probably a good idea to also set up a notification for pipeline errors too while we're at it.
Time for a test drive
Now everything should be set up. So it's time to give it a spin. All we need to do is upload a video file to our source bucket, e.g. 'transcoder-source'. This should trigger the Lambda function once the file finishes uploading to the bucket which in turn will create a transcoding job. If everything goes well the transcoded files should appear in the destination bucket and any set up notifications sent out.
Wrap up
Here at Evoluted we’ve used AWS’s Elastic Transcoder for several clients so that they can deliver high quality videos to their customers. We usually set up notifications so that when the transcoding process is complete a callback on the client’s website is called and we can start delivering the video content immediately on the site.
Using AWS’s SDK we can allow uploads to the source bucket via the website removing the need for users to see the AWS site. We can also create signed requests so that a video can only be viewed by certain users or limit the life of a video.
There are quite a few steps you need to go through to set up the buckets, pipeline and job, but once done you will have a seamless transcoding process.
If you require expert support with your next web development project, check out our development services today.

With more than two decades’ coding experience under his belt, Senior Developer Andy continues to prove an integral part of the Evoluted development team. Having been with Evoluted since 2012, he has worked on countless projects for our clients. An analytical thinker, his background includes time spent working as a theoretical physicist; which involved research into Quantum Optics.